Hanging a Colorful Quilt in My City Living Room


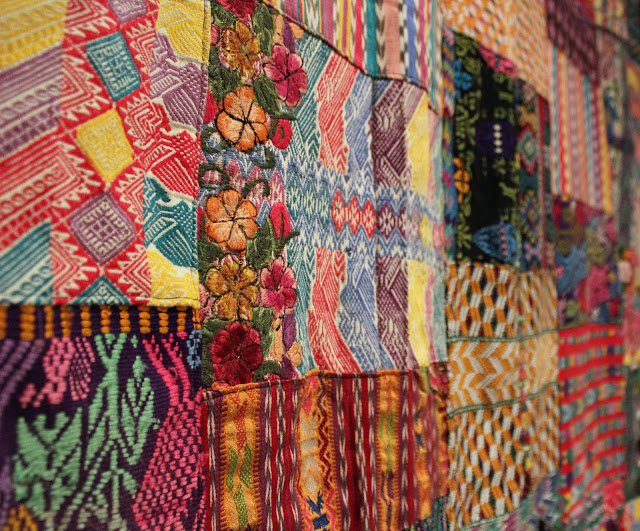
Three years ago, I went on an amazing trip to Guatemala with the Habitat for Humanity Global Village program.  Our last day there was spent in Antigua, where I bought this beautiful, handmade quilt.  It's huge, at 84" by 96".  It's been in a closet since I got back from the trip.  Sometimes used as guest bedding, but, for the most part, just sitting on a shelf, which is pretty sad for such a beautiful thing with so much sentimental value.

I participated in Apartment Therapy's January Cure this year (so worth it!!), and when we came to the "Hanging Artwork" assignment, I decided it would be a good time to hang the quilt.  I'm a month late, but that's ok.

What once was a boring, blank wall ...


... is now a colorful, happy reminder of an incredible trip.  


And it really does show that with the right planning, the correct tools, and a good ladder, a job that might look like it requires two people can be fairly easily tackled by one, smallish woman.


The first step was to sew a "quilt sleeve" for the back of the quilt.  There are plenty of tutorials from real quilt people out there (here is one of the ones I used), so I won't bore you with the details, but it's basically a tube of fabric (I used some scrap Ikea curtain fabric) sewed to the back of the quilt.


The trick is to make it with a little slack so that your quilt won't bulge when you hang it.  You can sew the sleeve on a sewing machine, but you have to hand-stich the sleeve onto the back of the quilt, so that it doesn't show from the front.


You also need a rod of some sort to hang the quilt on.  I used a piece of pine 1-1/4" x 6/16" molding.  (You can see it sitting on the table in the "boring wall" photo above.)  Once you have cut the molding or whatever you're using to the correct size, you need to attach screw eyes to both ends.


You then want to take your molding with the screw eyes and measure and attach it to the wall without the quilt on it.  The reason for doing this is to check for level before you go to the trouble of hanging the quilt, which is heavier and therefore harder to hang than just the light molding.  For now, I have hung it with medium-sized nails with a large head.  As soon as I'm ready to commit to a bigger hole in the wall, I plan to go back and replace the nails with sturdier, self-drilling drywall anchors and screws.

Once you're happy with the molding, take it down off the wall and put it through the sleeve.  Make sure that you have the molding in the exact same orientation (left, right, front, back) as when you had it on the wall, as it could be bowed (like mine was), and using it in another orientation might change how level it is.  

I was lucky to have a sturdy table that I could carefully walk on and use as a sort of platform.  I was able to hang the one end of the quilt, then, holding the other end, shimmy across the glass table to hang the other end.  I used a ladder when I was measuring and nailing in the nails, but the table was easier for hanging.   

I chose to hang the quilt so that the bottom just skims the top of the baseboard molding.  And I centered it above the table.  
A few more angles:


It makes the room feel so much warmer and makes the table a more inviting place. 

Reclaimed Wood Art in My Country Dining Room


This project - to the right - has been in the works for months and months.  I'm so glad I finally did it!  

I was inspired by something I saw in the Pottery Barn catalog (for $399) - to the left.  I ripped the picture out of the catalog and carried it around with me every day - Pinterest, oldschool.

I knew I wanted to try to make it, but I was stumped (no pun intended!) by where to get wood that might work.  My first idea was pallets, but they're huge and won't fit in my car.  Plus, when I was researching pallets, I found some information that pallets can possibly have toxic chemicals.  I considered buying new wood and distressing it, but that seemed like a lot of effort. 

Then one day I was driving back to work after a meeting and saw a sign at side of the road, "WE SELL RECLAIMED LUMBER."  There was then a screech of tires and some dangerous lane-changing, but I survived and found the absolute perfect wood, at only $1 per foot.  This time I was able to fit the wood in my car, and I transported it to my country house, where I have a table saw, more space to work on projects, and a shed to store things.
  

I used a 24"x24" piece of particle board to draw out a rough design.  Then I started cutting.  It was sort of like putting together a puzzle.  A few hours later, this is what I had.


I tried to alternate vertical and horizontal pieces, mostly 2" wide but some thicker and some thinner.  Some pieces had screws sticking out or holes from nails, adding interest.  I sanded the cut edges to match the softness of the original edges of the pieces of wood.

The Pottery Barn inspiration piece appears to be painted, but I wanted something more natural-looking, so I decided to use stain.  I also didn't want the crayon box range of colors used in my inspiration piece, so I opted for a few natural hues.  I used black, "cabernet" (burgundy), "sun-washed" (grey - more like a paint wash than a stain), and natural.  I took one color at a time and, using a paper towel, blotted on the stain, aiming for a balanced look.  Then came the boring part of gluing the pieces to a piece of plywood (the particle board that I used to arrange the pieces was way too heavy), adding decorative nails (after drilling pilot holes to make things easier), and framing it with some of the same wood.  And then the exciting part of hanging it on the wall.


Oh yeah, I guess I should mention this:  My total cost was around $35.00.  That makes me very, very happy.


FEBRUARY 27, 2013 UPDATE:  


I just submitted this project to the Young House Love Pinterest Challenge.  You can check it out over there - looks like I'm number 84 - as well as see all of the other amazing entries!  Also, here are links to the projects completed by the hosts of the challenge:  Megan (The Remodeled Life), Katie (Bower Power), Sherry (Young House Love) and Michelle (Decor and the Dog).

So that I'm official, here are the links to the inspiration for my project on Pinterest and to the original at Pottery Barn.


Orla Kiely in My City Kitchen


I remodeled my kitchen in the city three years ago.  It was such a fun process!  I started with a red sink with a red faucet (there when I bought the condo), red walls (which I am totally responsible for - I was trying to match the sink), black and white appliances, a white Corian counter, white ceramic tile floors, and Ikea cabinets that were looking a little worn around the edges (literally).


I decided to keep the counter and the cabinet bases.  I love white subway tile (I have it in my bathroom), but with white cabinets, it would have been too much white, so I went with a beautiful, green glass subway tile.  Grey slate floors.  A white sink.  Stainless appliances.  And new white Shaker-style cabinet doors and drawers, which I ordered online.  I can't tell you how nervous I was about whether I had measured correctly, but it turned out perfectly.  I installed all the doors and drawers myself.  Three years later, I'm still in love.


Back then, I had a serious "thing" about matching.  And I strongly believed that in kitchens, "kitcheny" artwork was required.  So this is what I chose for a large wall that is to the right of the view in the above picture.


I should probably also show you the before view of this wall.


When I said it was red paint, I meant it!!  (This was before paint+primer was invented, so it took me five, yes five, coats.)  Removing the cabinet made such a huge difference.  It made the kitchen look much bigger.  I made up for lost storage with a large wire shelving unit from the Container Store.

I liked the artichoke art at first, but after a while, I got really tired of it.  It was too matchy, and the neutral colors made it difficult to use bright colors elsewhere in the kitchen.  I felt like it was sucking all of the life out of the kitchen.   

When I decided that I needed to replace the artichokes, I thought I had the perfect solution - Orla Kiely's stem print fabric.  I love the pattern and colors, and there was enough green in it to satisfy my urge for matching (still not cured), but it was clearly far far from boring and neutral.  I soon discovered that you can't buy that fabric anywhere.  So sad.  I found this post on Making It Lovely when I was looking for the fabric online, and I totally feel Nicole's pain.

Then one day I was in a little housewares shop in Dupont Circle called Tabletop and made a very exciting discovery - Orla Kiely stem wrapping paper!!  For just $4 a sheet.  And the wrapping paper was reversible, with the large stem pattern on one side and the small pattern on the other.  Sold!

My original idea was to cover the artichoke canvas with the paper.  This was my first attempt at decoupage, and although I liked the idea of it, and the layout came out ok, it was a little rough looking, with bubbles and wrinkles, which are worse than they appear in the picture below.    


So I scrapped this (I took it to my country house and hung it in the utility closet over the circuit breaker box - in that location, you don't really notice the imperfections) and started again.  This time I decided to try a wall collage, with a smaller Orla Kiely decoupage of the large stem pattern as the main element and a framed piece of the small stem pattern as a complement.  I then filled it in with other things I already had, and tada!


The other items are antique stained glass (I love love love - and collect - stained glass), an eggplant trivet, an "eat" trivet, and a framed color photocopy of a napkin I bought at Anthropologie.  I also added some fun hooks from World Market (below right in the photo).  The hanging files are from Ballard Designs from a few years back.  They really help with mail and paper control.  One is labeled "TO FILE" and the other "TO DO."  By the way - I realize this is a crappy photo.  I took several, with both camera and iPhone, and this is the best of the lot.  I just may need a new camera.  UPDATE:  I just got a new DSLR camera!!  Very exciting.  I replaced the photo, but it's not much better than the original one.  Oh well.

One more time, here's a close-up of the decoupaged Orla Kiely:


I started with an ugly wood "art" thing from Home Goods that was on sale in the clearance section (what?? I can't understand why no one wanted to buy it ... hee hee) for only $5.


Then I painted the sides with green Oops paint that I already had on hand and primed the top. 


After that was dry, I put the Orla Kiely paper on top using 3 parts Elmers Glue to 1 part water (which here was 1 tablespoon of glue and 1 teaspoon of water) painted with a foam paintbrush onto the wood, onto the back of the paper, and onto the top of the paper.  After that dried, I brushed on some matte polyurethane with a foam brush.  

The final look is much more me.  I'm considering getting a retro turquoise or orange clock to replace the existing one.  What do you think?